OpenAI Codex Setup: AGENTS.md, MCPs, Skills (Definitive Guide 2026)
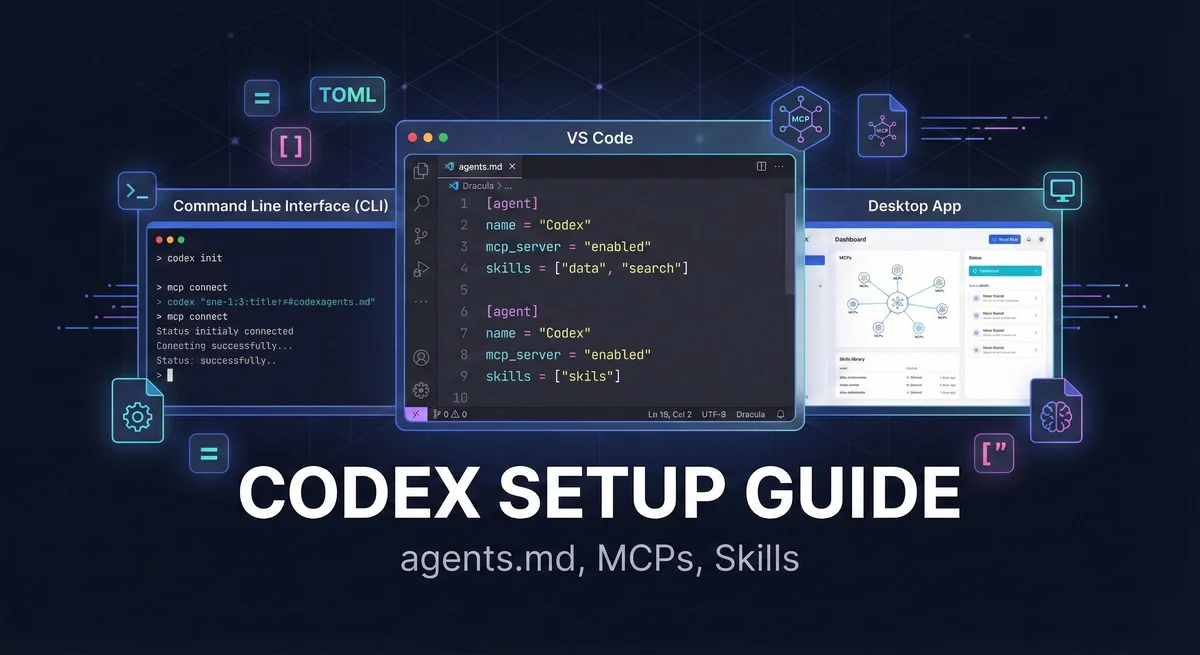
OpenAI shipped Codex in three interfaces: CLI, VS Code extension, and a macOS desktop app. They all read the same config files underneath, but expose settings differently—CLI uses flags, the extension has its own UI, and the desktop app has a settings panel.
Key Takeaways (TL;DR)#
- Three interfaces, one config stack. CLI, VS Code, and the Desktop app all read the same
~/.codex/config.toml,.codex/config.toml, AGENTS.md files, skills, and cached login. - Codex has built-in web search + compaction. You can enable cached/live web search and tune auto-compaction in
config.toml(no MCP required). - AGENTS.md is a “walk down the tree”. Codex concatenates instructions from repo root → current folder (with optional override files).
- MCP is first-class. Add servers in
config.tomland they show up across Codex surfaces; usecodex mcp add/list/loginto manage them. - Desktop app is macOS-only (for now). CLI + VS Code cover macOS/Linux/Windows workflows.
What Is Codex (and what it is not)?#
Codex is OpenAI's take on agentic coding: a system that reads your codebase, runs terminal commands, and edits files based on what you tell it. Unlike Claude Code or Gemini CLI which launched with a single interface, Codex shipped three different ways to use it:
The three flavors:
- Codex CLI - Terminal-based agent. Fast, scriptable, full MCP support. This is the good one.
- VS Code Extension - IDE integration. Same engine as CLI, but lives in your editor sidebar. Actually works well.
- Desktop App - Standalone macOS GUI. Useful if you want a dedicated agent workspace (and it still shares the same config/skills/MCP setup).
What it is not: A drop-in replacement for GitHub Copilot or Cursor's tab completion. Codex is an agent—it takes broader instructions and works autonomously. Give it vague boundaries and it'll happily refactor your entire codebase when you asked for a one-line fix. To get predictable results, you need an AI-ready codebase with clear structure and context.
How access works: Codex can run via your OpenAI plan (recommended) or via an API key (usage-based billing). Don’t assume you must use an API key — the default flow is to sign in.
The mental model across all three interfaces:
- Instructions (what to do, how to behave) → AGENTS.md
- Tools (what it can access) → MCP servers
- Guardrails (what it must not touch) → Skills + permissions + safe defaults
The three Codex entry points compared#
| Feature | Codex CLI | VS Code Extension | Desktop App |
|---|---|---|---|
| Best for | Terminal workflows | IDE-centric development | Dedicated agent workspace |
| Auto-compaction | Yes | Yes | Yes |
| MCP support | Yes | Yes | Yes |
| Skills | Yes | Yes | Yes |
| Performance | Fast | Fast | Laggy |
| Pricing | OpenAI plan or API key | OpenAI plan or API key | OpenAI plan or API key |
How Codex compares to Claude Code and Gemini CLI#
Real talk after using all three for production work:
Codex vs Claude Code:
- Different UX. Codex is optimized for “agent runs” across CLI/IDE/Desktop; Claude Code is optimized for terminal-first developer workflows.
- Long sessions. Both can work on big codebases; performance is mostly about how you scope tasks and how you manage context.
- Claude Code's documentation is exhaustive. Codex docs are... present. You'll be reading source code for edge cases.
- AGENTS.md is intentionally simpler than CLAUDE.md. No weird memory file inheritance rules. What you see is what you get.
Codex vs Gemini CLI:
- Gemini gives you a generous free tier. Codex generally requires an OpenAI plan or an API key (usage-based billing).
- But Codex's tool calling is more reliable when it works. I had fewer "I can't do that" moments compared to Gemini's occasional flakiness.
- Gemini has Google Search built-in. Codex has built-in web search too (cached or live), configurable in
config.toml. - Context window: Gemini advertises 1M tokens. Codex is optimized for coding and can auto-compact long sessions when configured.
My honest take: Use CLI or the VS Code extension for day-to-day coding. Use the Desktop app if you prefer a dedicated agent space (or if you want to separate “agent work” from your editor/terminal sessions).
Step 1: Install Codex (CLI, VS Code, Desktop) and Verify It Works#
Option A: Codex CLI via npm#
Prerequisites: Node.js 18+.
Install globally:
Sign in (recommended):
Option B: VS Code Extension#
- Open VS Code
- Go to Extensions (Cmd/Ctrl+Shift+X)
- Search for "OpenAI Codex"
- Click Install
- Open the Codex panel (Cmd/Ctrl+Shift+P → "OpenAI Codex: Open Panel")
- Sign in when prompted (OpenAI account or API key)
Option C: Desktop App (macOS)#
Download from the OpenAI Codex website. The Desktop app is currently macOS-only.
Real talk: If you live in the terminal or in VS Code, you can ignore the desktop app. It’s useful if you prefer a dedicated agent workspace.
If you don't need those extra credits, stick with CLI or VS Code extension. They're faster and more capable.
- Download the .dmg file
- Drag Codex to Applications
- Launch and sign in
- Select folders to work with
Verify installation#
Test the CLI:
In VS Code, open the Codex panel and type /help to see available commands.
In the Desktop app, open Settings to confirm you’re signed in and your working folders are available.
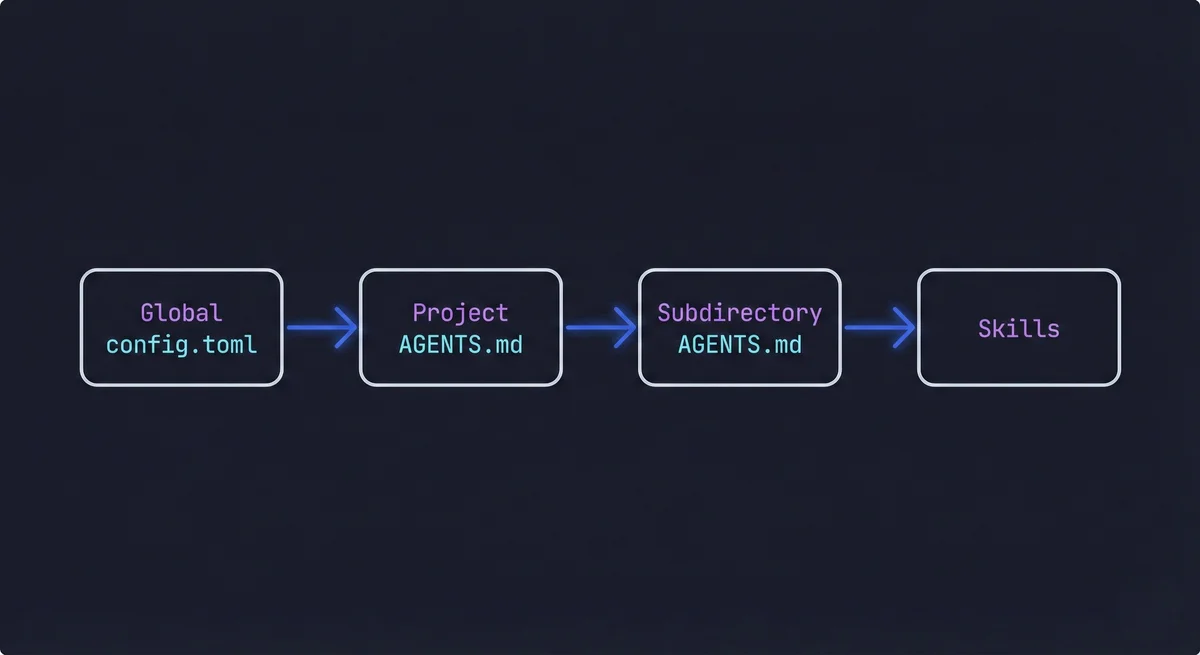
The Instruction Stack: One Config, Three UIs#
Here's what surprised me: the CLI, VS Code extension, and Desktop app all read from the same config files and skill folders. The “it works here but not there” issues usually come from scope and precedence, not from separate config systems.
Think in layers:
- AGENTS.md → Repository instructions (applies by directory, concatenated root → current folder)
- Skills → Reusable playbooks (repo
.agents/skills/+ user~/.codex/skills/) - config.toml → Preferences + MCP connections (
~/.codex/config.toml+.codex/config.toml) - Permissions → What Codex may do (Auto / Read-only / Full access; configurable and switchable)
Step 2: Create AGENTS.md (then keep it minimal)#
AGENTS.md is where you tell Codex how to work in this repository. Unlike CLAUDE.md or GEMINI.md, it uses a simple “walk down the tree” merge.
AGENTS.md hierarchy and merge order#
Codex discovers instruction files by walking from the project root to your current directory. In each directory, it checks (in this order):
AGENTS.override.md(optional “local override”)AGENTS.md(recommended canonical name)agents.md(legacy fallback)
All matches are concatenated from root → current folder. Codex also supports global instruction files under your Codex home directory (typically ~/.codex/).
Generate a starter with /init#
Inside Codex (CLI or VS Code), run:
/init
Codex generates a starter AGENTS.md for your repo. Review it, delete the fluff, keep only what improves outcomes.
What belongs in AGENTS.md (10 bullets max)#
- What this repo is and who it is for
- The commands that actually matter (dev, build, test, lint)
- "Start here" pointers (3-6 files Codex should read first)
- The architecture map (major directories and boundaries)
- Hard constraints (e.g., "static export only, no server actions")
- Non-obvious conventions (naming, imports, generated code)
- "Do not touch" boundaries (secrets, production configs)
- How you want changes verified (tests, typecheck, lint)
- Preferred model for this project (if any)
- Links to additional docs
What does NOT belong in AGENTS.md#
- Manifestos. If your AGENTS.md is longer than your README, it's bad practice. Keep it skimmable.
- Style guides. Link to your eslint/prettier configs. Don't paste style rules into AGENTS.md.
- Secrets. Never put API keys or tokens here. Use environment variables.
- Vague platitudes. "Write clean code" or "be helpful" adds zero value. Be specific or delete it.
If it's getting unwieldy, move detailed guidance into skills or project docs. For a framework on deciding what context goes where, see A Developer's Guide to the 5 Essential Context Types for AI.
How AGENTS.md differs from CLAUDE.md and GEMINI.md#
Having configured all three, here are the key differences:
| Feature | Codex AGENTS.md | Claude Code CLAUDE.md | Gemini CLI GEMINI.md |
|---|---|---|---|
| Location | AGENTS.md (plus optional AGENTS.override.md) | CLAUDE.md or .claude/CLAUDE.md | GEMINI.md or .gemini/GEMINI.md |
| Hierarchy | Root → current folder (concatenated) | Complex (multiple memory files) | Medium (global + project) |
| Syntax | Markdown | Markdown with frontmatter | Markdown with optional JSON |
| Scope | All three Codex interfaces | Claude Code only | Gemini CLI only |
| Override | Subdirectory files override parent | Complex merge rules | Standard inheritance |
AGENTS.md wins on simplicity. No memory file inheritance to puzzle over. No wondering which file takes precedence. If you have used Claude Code's CLAUDE.md, AGENTS.md will feel familiar but less bureaucratic.
AI coding tools, compared
Get setup guides and honest comparisons of Codex, Claude Code, and Gemini CLI.
Step 3: Connect External Tools with MCP#
MCP (Model Context Protocol) is Codex's way of talking to external services. It's like plugins, but you can actually see what they're doing.
Where MCP config lives#
Codex uses config.toml for all configuration. Locations by scope:
| Scope | macOS/Linux | Windows |
|---|---|---|
| User (global) | ~/.codex/config.toml | %USERPROFILE%\.codex\config.toml |
| Project | .codex/config.toml | .codex\config.toml |
Configuration precedence is a stack (highest wins): CLI flags + explicit config → profiles → project configs (root → current folder) → user config → system → defaults.
Quick-start: add a GitHub MCP server#
The easiest way is using the CLI:
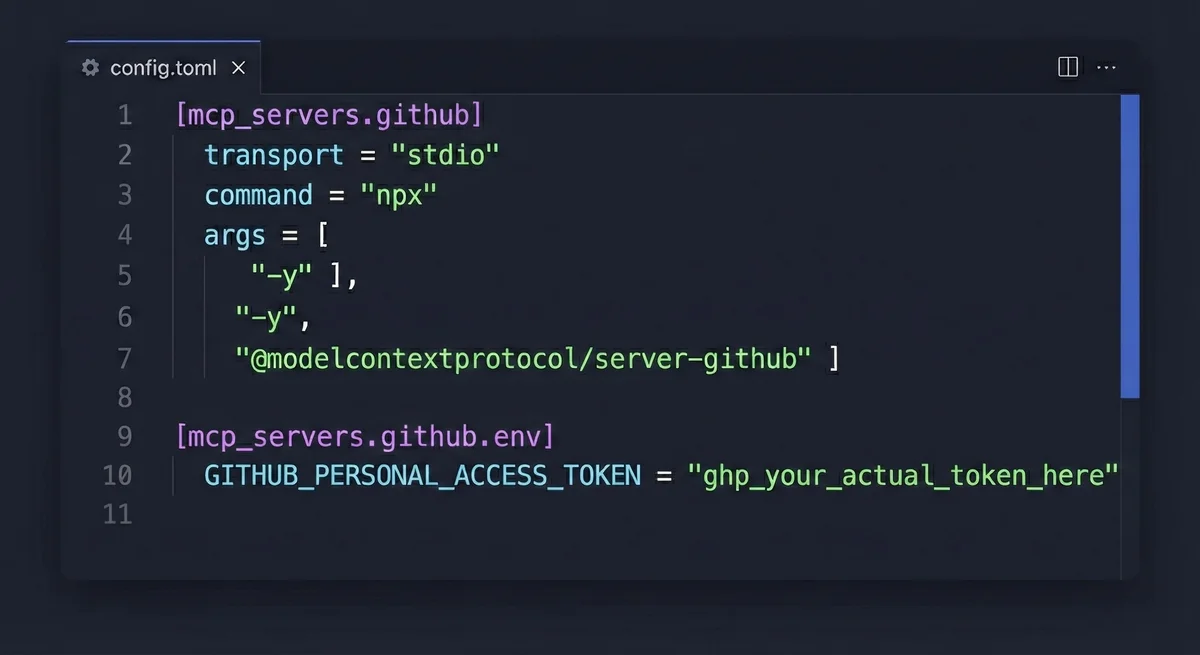
Or manually edit ~/.codex/config.toml:
[mcp_servers.github]
command = "npx"
args = ["-y", "@modelcontextprotocol/server-github"]
env_vars = ["GITHUB_PERSONAL_ACCESS_TOKEN"]
Set the token via environment variable:
Note on token handling: While environment variables are the standard approach, some MCP servers and applications have issues reading them properly. If you encounter authentication failures despite setting the env var, you may need to hardcode the token directly in the config file as a fallback:
[mcp_servers.github]
transport = "stdio"
command = "npx"
args = ["-y", "@modelcontextprotocol/server-github"]

[mcp_servers.github.env]
GITHUB_PERSONAL_ACCESS_TOKEN = "ghp_your_actual_token_here"
⚠️ Security warning: If you hardcode tokens, never commit the config file to git. Add .codex/config.toml to your .gitignore immediately. Rotate the token if it ever gets exposed.
Example: Atlassian MCP (Jira + Confluence)#
Add to ~/.codex/config.toml or .codex/config.toml:
[mcp_servers.mcp-atlassian]
command = "uvx"
args = ["mcp-atlassian"]

env_vars = [
  "JIRA_URL",
  "JIRA_USERNAME",
  "JIRA_API_TOKEN",
  "CONFLUENCE_URL",
  "CONFLUENCE_USERNAME",
  "CONFLUENCE_API_TOKEN",
]
Do not commit this with real tokens. Ever.
MCP troubleshooting matrix#
MCP troubleshooting matrix (fast fixes)
| Symptom | Likely Cause | Fix |
|---|---|---|
| MCP tools not appearing | Server not configured in active scope | Add to ~/.codex/config.toml or .codex/config.toml, then restart Codex. |
| Authentication failed | Missing or expired token | Check env vars with echo $GITHUB_PERSONAL_ACCESS_TOKEN. Verify token permissions. |
| Command not found (npx/uvx) | Runtime dependency missing | Install Node.js (for npx) or uv (for uvx). |
| Server starts but tools fail | Wrong URL or permissions | Test the command manually outside Codex first. |
Step 4: Create Skills (Reusable Playbooks)#
If a workflow is repeatable, multi-step, or expensive to get wrong, put it into a skill.
Where skills live#
Skills can be defined at multiple levels, with fallbacks:
- Project skills:
.agents/skills/directory (recommended) - User skills:
~/.codex/skills/directory
If you are on a team, put shared skills in the repo. Keep personal hacks in user scope.
Suggested skill structure#
.agents/
  skills/
    code-review/
      SKILL.md         # Required - skill definition with YAML frontmatter
      examples/        # Optional example inputs/outputs
Example skill: code-review#
Create .agents/skills/code-review/SKILL.md:
---
name: code-review
description: Review code for bugs, style issues, and best practices
command: review
---

## What I do

- Review code diffs for bugs, logic errors, and security issues
- Check performance implications of changes
- Verify style consistency with project conventions
- Suggest specific fixes with line numbers

## When to use me

Use `/review` when you want a second pair of eyes on code changes before committing.

## How I work

1. Read the provided files or diff
2. Identify bugs and logic errors first (critical issues)
3. Flag performance issues (inefficient algorithms, N+1 queries)
4. Note security concerns (injection risks, unsafe eval)
5. Check style consistency with project conventions
6. Provide specific line-by-line feedback with suggested fixes

## Output format

- List issues by severity: Critical, Warning, Nitpick
- Include file path and line numbers for each issue
- Provide suggested code fixes when applicable
- End with an overall assessment (Approve / Request Changes)
Then use it in Codex:
/review @path/to/file
Example skill: documentation-update#
Create .agents/skills/documentation-update/SKILL.md:
---
name: documentation-update
description: Update documentation when code changes
command: docs
---

## What I do

- Identify documentation that needs updates based on code changes
- Update README.md when public APIs change
- Add inline comments for complex logic
- Write migration notes for breaking changes

## When to use me

Use `/docs` after making code changes that affect public APIs, behavior, or require user action.

## How I work

1. Analyze the code changes to understand what was modified
2. Identify affected documentation files (README, API docs, changelogs)
3. Update public-facing docs if APIs or behavior changed
4. Add inline comments for complex or non-obvious logic
5. Draft migration notes for breaking changes
6. Ask before creating new documentation files

## Guardrails

- Never delete existing documentation without asking
- Ask before creating new documentation files
- Keep inline comments concise - explain "why", not "what"
- Verify all code examples in docs actually work
Step 5: Add Notifications in config.toml#
Notifications save your sanity. You know when the agent finishes instead of checking every 30 seconds.
macOS notifications (notify)#
Edit ~/.codex/config.toml:
notify = ["afplay /System/Library/Sounds/Submarine.aiff"]
Linux alternatives#
Add to ~/.codex/config.toml:
notify = ["paplay /usr/share/sounds/freedesktop/stereo/complete.oga"]
Windows options#
Add to %USERPROFILE%\.codex\config.toml:
notify = ["powershell -NoProfile -Command \"[console]::Beep(800,200)\""]
Additional config.toml settings#
# Model preferences
model = "gpt-5-codex"
model_reasoning_effort = "medium"

# Permissions / approvals
approval_policy = "on-request"   # Options: untrusted, on-request, never
sandbox_mode = "danger-full-access" # Options: read-only, workspace-write, danger-full-access

# Web search (optional)
web_search = "cached" # Options: cached, live, disabled
Common Mistakes (and how to fix them fast)#
Mistake 1: AGENTS.md becomes a dumping ground#
Fix: Reduce it to 10 bullet points max. Move procedures into skills, long-form docs into a docs/ folder.
Mistake 2: Tokens end up in git#
Fix: Avoid putting secrets into .codex/config.toml. Prefer environment variables with env_vars = [...], and keep .codex/config.toml committable (no tokens).
Mistake 3: MCP servers not connecting#
Fix: Check scopes and run codex mcp list. Verify the command works outside Codex first. Check that environment variables are exported in your shell.
Mistake 4: Expecting Desktop app to respect config.toml#
Fix: All three surfaces can share the same config, but they may not hot-reload it. If something “doesn’t apply”, restart the surface and re-check which config layer you edited (user vs project vs profile).
Mistake 5: Getting surprised by permissions#
Fix: Codex defaults to permissive behavior in trusted projects. If you're new to a repo, start in a stricter mode and loosen it later. You can set defaults in config.toml and switch live with /permissions:
approval_policy = "untrusted"
sandbox_mode = "read-only"
Then switch to Auto / Full access only when you trust the workspace and guardrails.
Frequently Asked Questions

Enjoyed this post?
Find out which LLM is cheapest for your use case — I test new models as they launch
No spam, unsubscribe anytime.